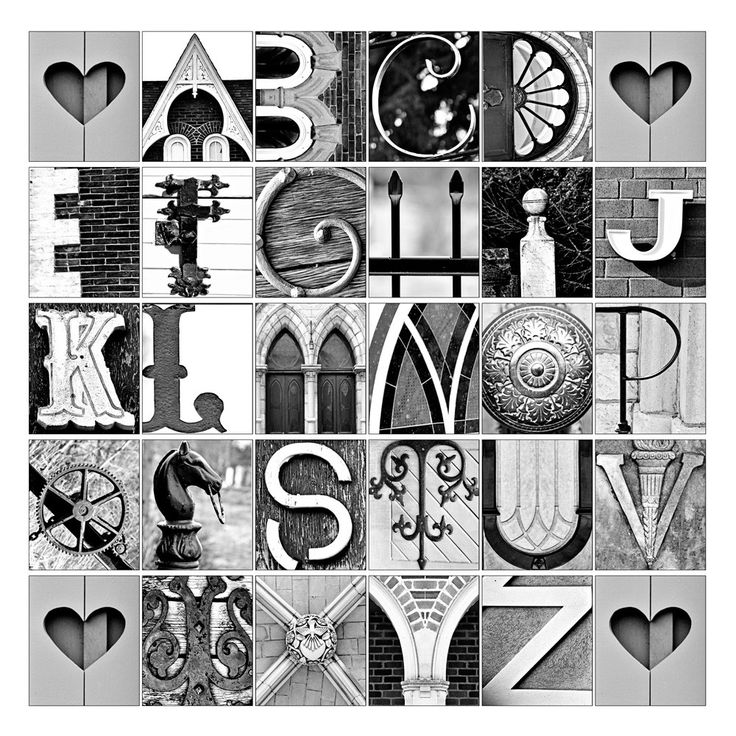
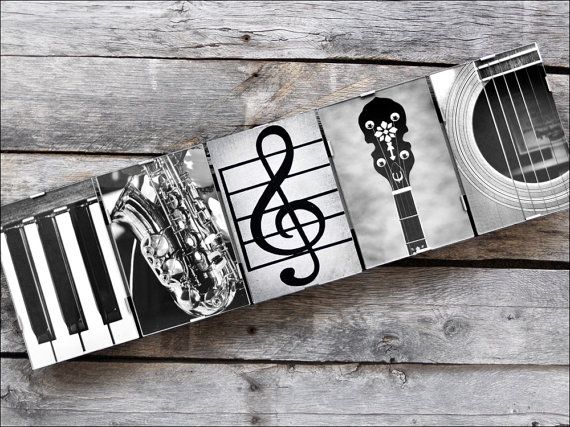
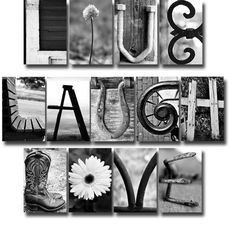
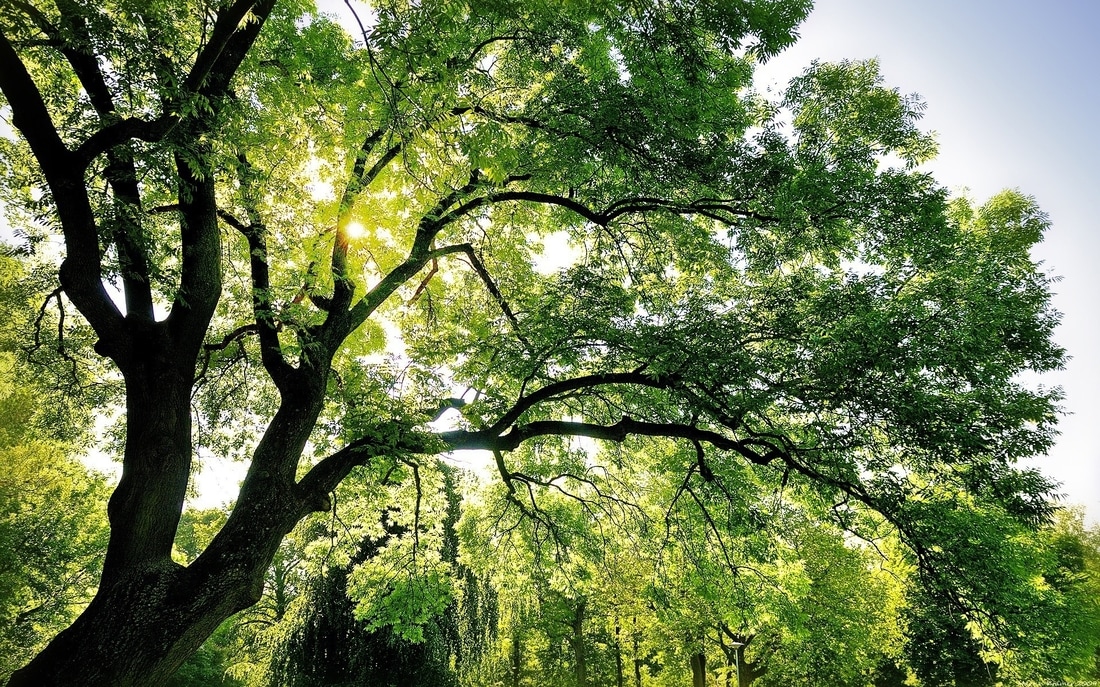
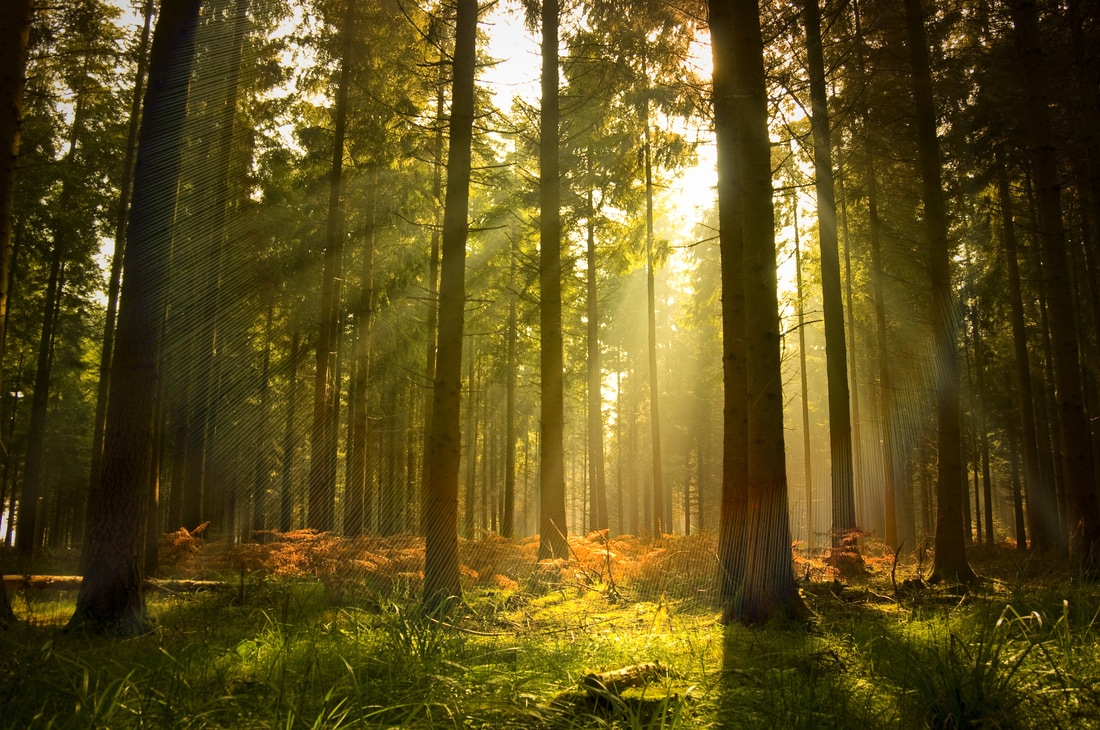
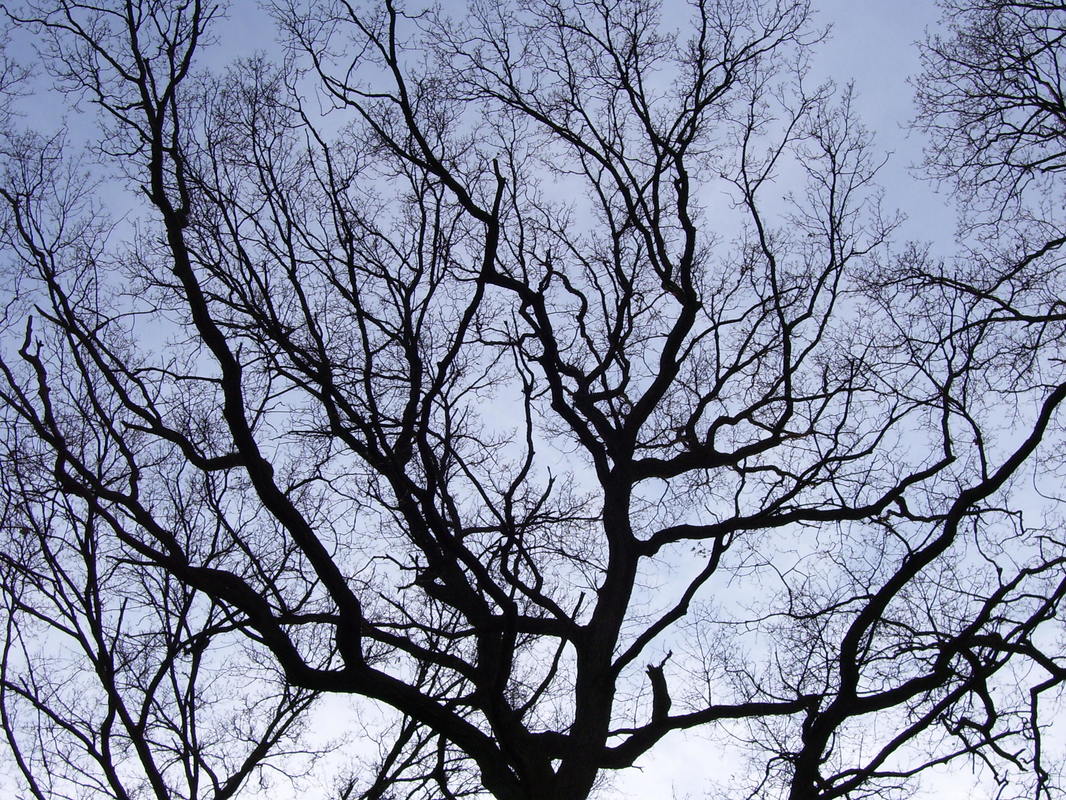
 For your final you will need to find/take pictures of things that resemble the letters of your name. You MUST alter/edit each letter (i.e. you cannot just find a letter off the internet and use that without changing it at all.). in your entire project you must use the following GIMP tools at least once. - Lasso tool - Color Adjust.....(Hue/Saturation or Brightness/Contrast) - Scale Here are some examples.....Get creative and have fun with this.
0 Comments
Hi Everyone,
sorry but I will be out today. I have all of you listed below and what you should be working on. Canvas Sketchbook covers are on the top of the shelf behind my desk. Also, if you glossed yesterday your sketchbook cover may be in the cosmetology room. Rya: Finish designing sketchbook. Emma: Finish designing sketchbook Robert: Sorry Robert. you are at the stitching step so you need to wait for me. Can you help others today if they need to gloss. Heidi: Trim the edges of your sketchbook cover. Claire: Sorry Claire. you are at the stitching step so you need to wait for me. Can you help others today if they need to gloss. Stephen: Design your digital collage LeeAnn: Finish designing your sketchbook Justin: get started designing you sketchbook Dawson: Finish designing your sketchbook Phoenix: get started designing you sketchbook Richard: Trim the edges of your sketchbook Jordan: Paint your sketchbook red Justiina: Finish designing and gloss Wesley: Make final edits to Highlight film. Add music Shayla: Sorry Shayla, you are kind of at pause. I will have your image printed on Monday. Get homework, or work on some of the assignments you might be missing for my class. Ivy: Trim the edges of your sketchbook Grace: I know you will be with Ms. Rather today to help with carnations. We will start painting on monday. Ariana: Start Designing your sketchbook in the art room Cierra: Finish designing your sketchbook. It can be simple and minimal, but try to include some artwork done by hand in the open areas of your sketchbook. My daughter has a Doctor's appointment this morning....you should all have something to be working on with your sketchbook covers.
1: completing the digital collage: about half of you have submitted your collages to me. If you are waiting on me to print, we will have to get to that tomorrow. If you have not submitted it to me, try to finish today, export it, and email it to me. 2: Transferring images: Some of you are in the transferring process. The iron is above the cupboards on the teacher desk. It is already at the correct settings so you just need to plug it in. Wait until the light is green (this is when it is hot enough). *iron transfer paper for 3-4 minutes, let cool about a minute and slowly remove the paper. Justin....your paper is in the top drawer of the teacher desk. 3: For those of you who have transferred your design, you can begin work in the art room on what the rest of your canvas will look like. Any supply is fair game and can be used on the canvas. Wesley--Let's try to finish your video this week. Start looking for music to go along with the clips. Hello everyone. I am out with a sick child today. Provided her fever stays away and the doctor gives her the all clear to return to daycare, I will be back tomorrow. That said, your collages for your sketchbook must be completed this week. For those of you who have finished, and shared it with me. Check the blog post page as you will have a post due this week.
Everyone else, you should be working on your collage for your sketchbook cover. See the posts below to remind you of project dimensions and requirements. **do not forget that your final step in this assignment is to flip your text layers. See tutorial below on how to do this. Since we will be transferring our artwork to a canvas, you need to treat the text as if you were creating a printing block or stamp...it must be backwards on the computer screen, otherwise it will be backwards when transferred to your canvas. To do this, you need look closely at your composition and figure out any layers that have text on them. Select one layer with text. Go to Tools-->Transform Tools-->Flip Once you do this you will see a Double sided Arrow appear as your cursor. You need to click on your image, on the layer you are trying to "flip" and it should flip. You may have to use your "move" tool to reposition your elements Scriptalizer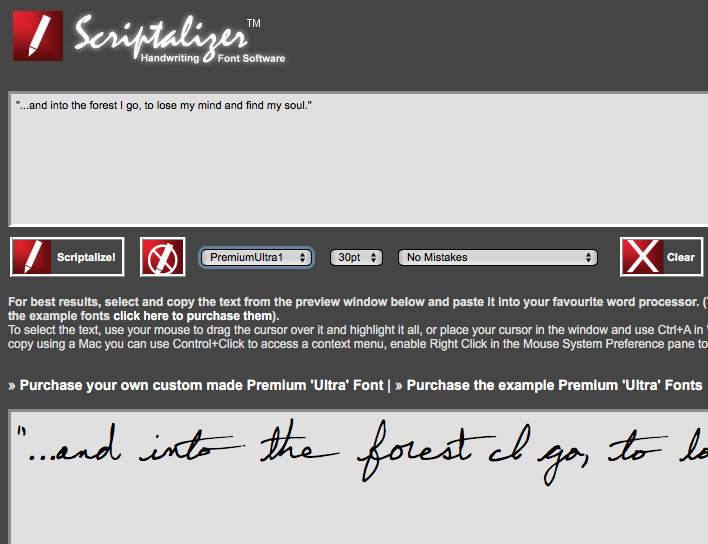 Scriptalizer allows you to type in whatever you want and it will give you the look of a hand written note. You can play around with different styles of handwriting. The easiest way to get your writing onto a GIMP file is to take a screen shot first. Then import it. Chalkboard Generator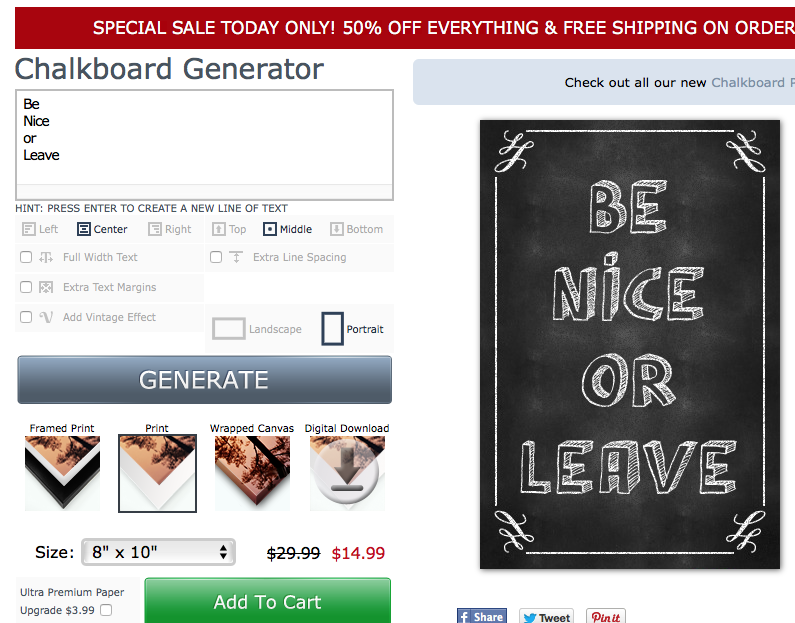 Postergen.com allows you to create various fonts including a chalkboard style of writing. Again, to avoid paying the 14.99 for the image. Just take a screen shot. Graffiti Creator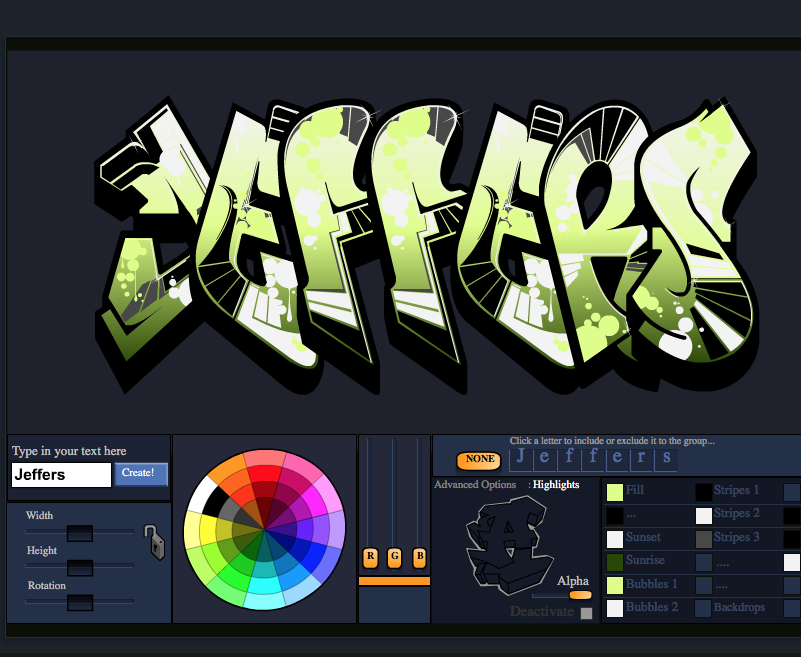 This website is a fun way to create a graffiti like tag. You can play around with different fonts, colors, flare etc. This site is free so you can either take a screen shot or download your image. Sometimes this site is very touchy so don't get too frustrated if something gets glitchy. Wordcloud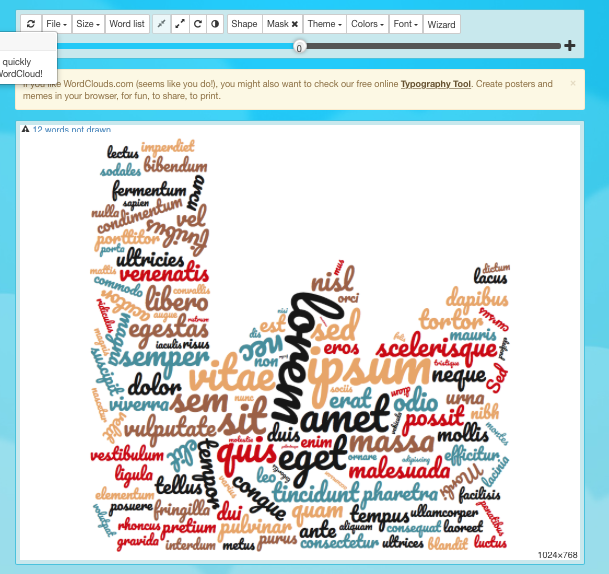 Word cloud allows you to type in or paste a list of words, choose your colors and fonts and it will jumble them up into a random assortment. This might be a good option for those of you who are looking to have your text element be more of a background texture.
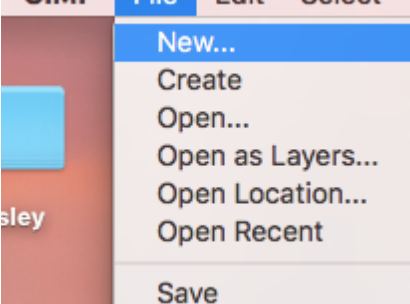
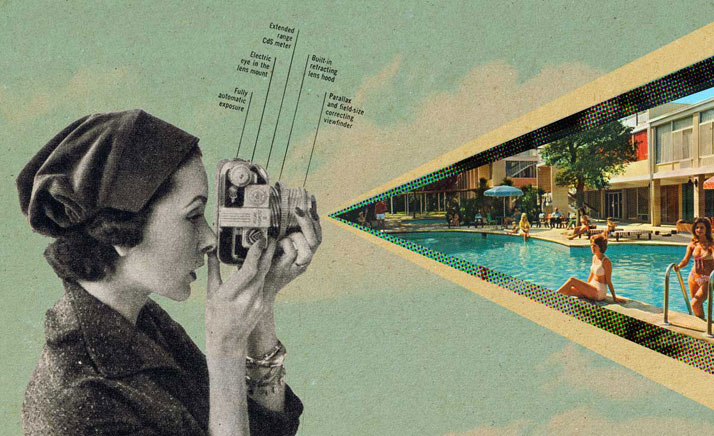
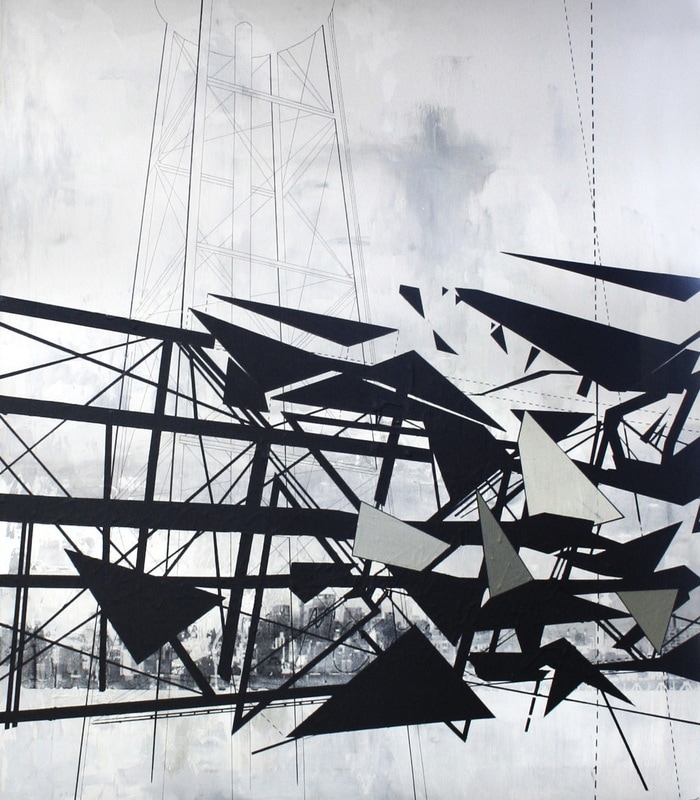
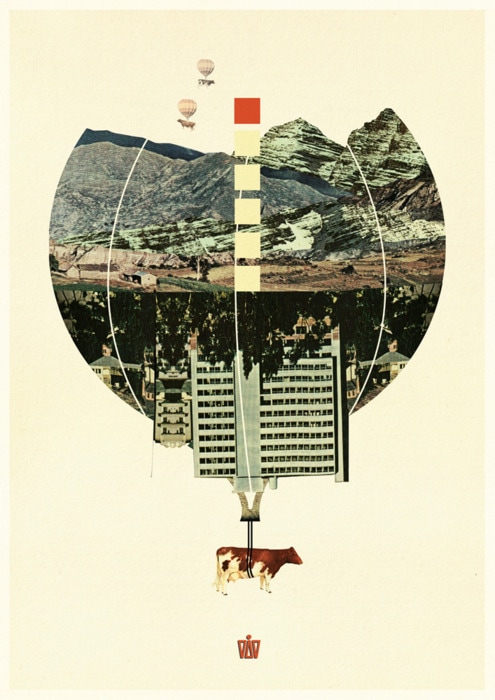
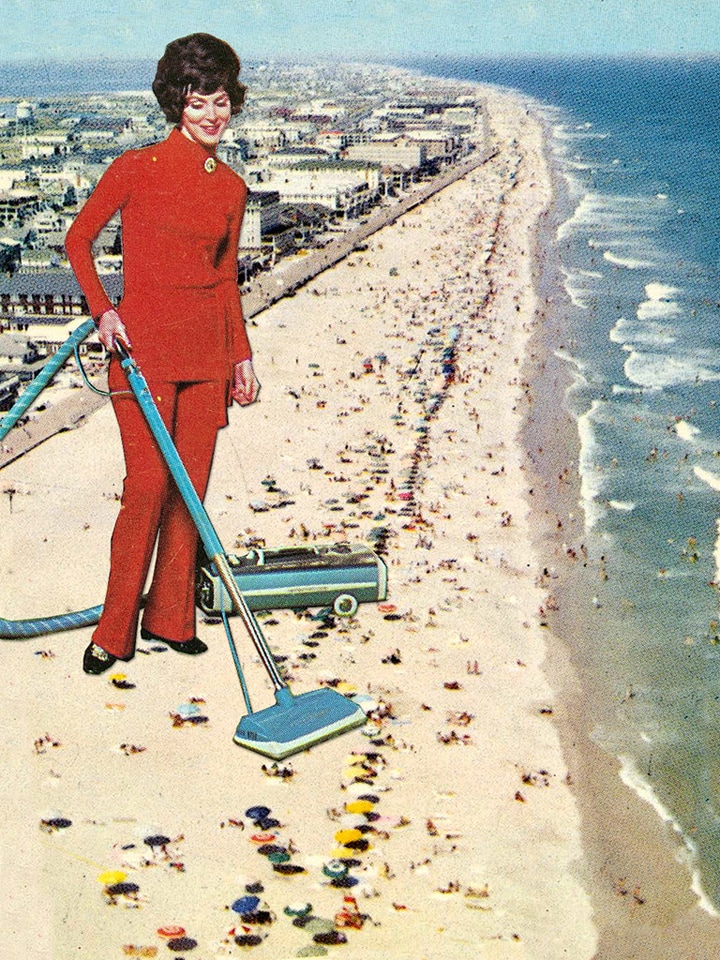
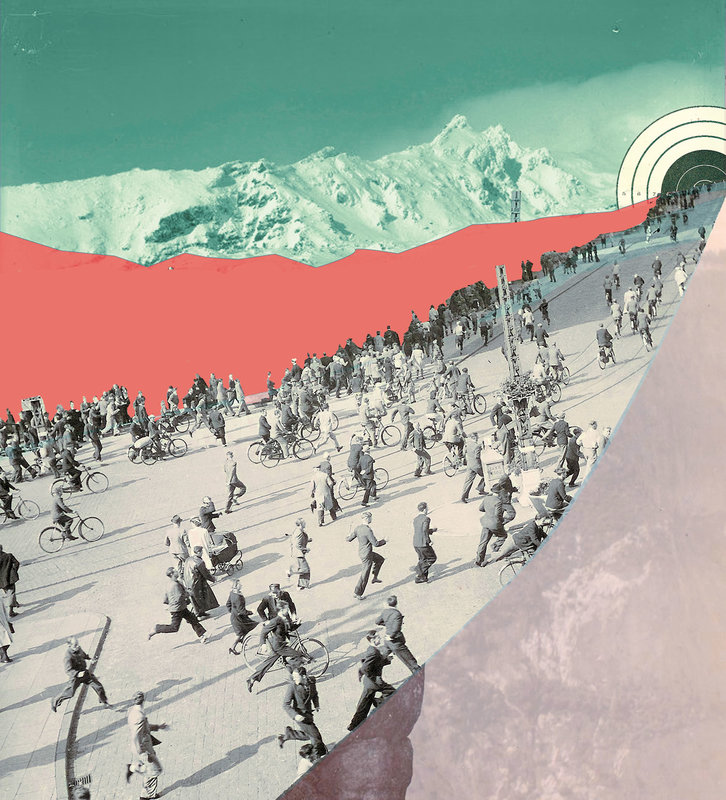
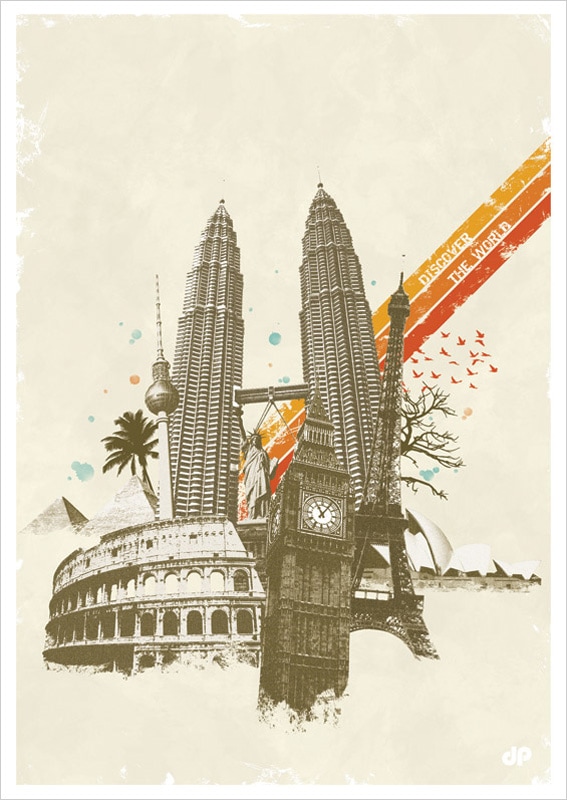
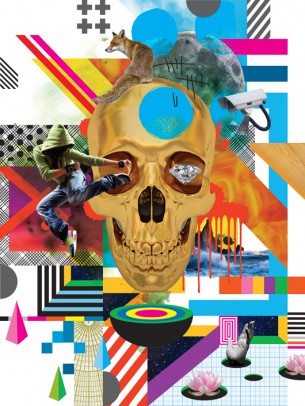
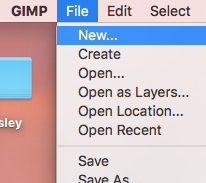
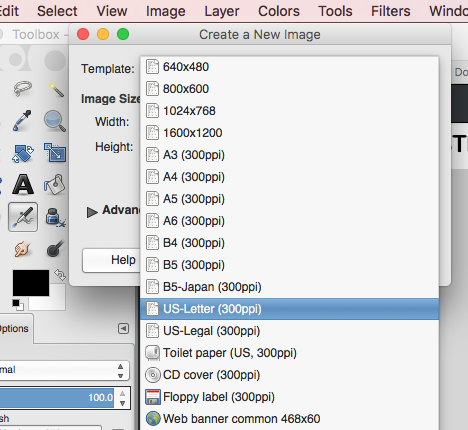
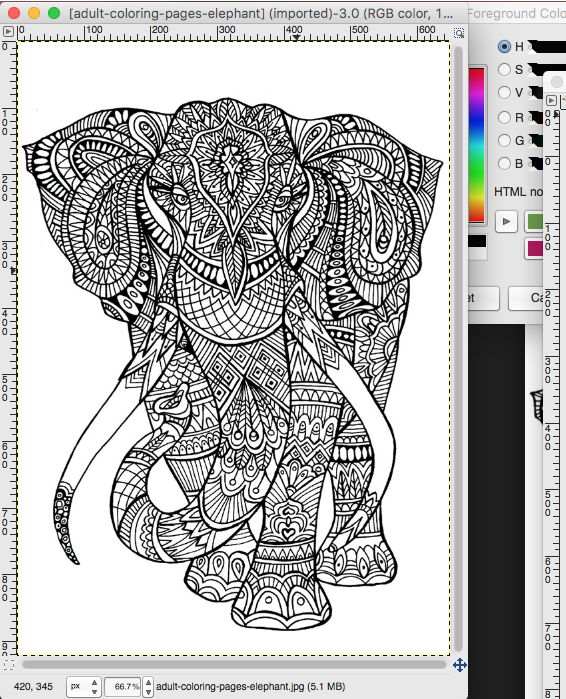
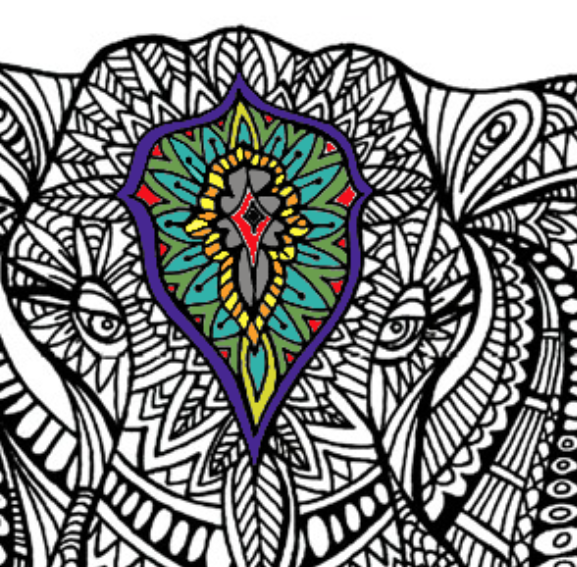
Hello Everyone, I am out sick today. That said, you all have something you should be working on. See the Project list below. I must have grades for 3rd Quarter entered by FRIDAY. So please keep yourself moving today if you are behind. **if you are having a hard time finding the instructions for a particular project, make sure you reference the "Categories" section of this page....it will make things easier for you.  If you are working on the current project--Digital Collage Sketchbook, please refer to the previous post. Many of you have started gathering images. It might be a good idea today to start playing around with some ideas in GIMP. Just like if you were to be doing a real painting or collage, it is good to have several ideas to start with. Make sure you reference the instructions below on the size of your document in pixels. I would hate to see you start with a "canvas" that is too small.....it will be very pixelated and grainy when we print and transfer it. When setting up your file in GIMP. Go to FILE-->NEW. Under Templates select the US LETTER (300ppi). **this will give you a large enough image space to print a high resolution document.** For this next project. You will have A LOT of freedom with your creative process. You will be creating a digital collage using GIMP that will be printed on transfer paper and then transferred to a piece of canvas. 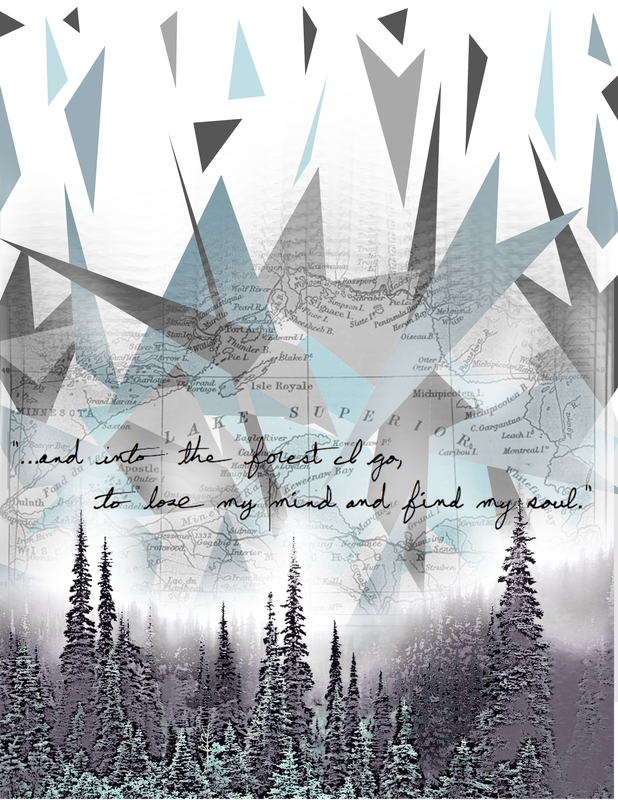 At this point you will be able to add drawings or paint to the canvas. You will each create a clay button and we will stitch this into a sketchbook. This will be a lengthy project so DO NOT RUSH! There are a few requirements that your final collage must include before it is printed. - you must work with several layers. - There must be a text element in your collage this could be large text or small text layered in the background to create a texture. - you must have some transparency to your image. - you must use your lasso tool to select what you are going to collage. Do not just stack your images together. - you must use some original photos. You can find some of your images off of the internet but some photos must be original...either photos that you, or someone you know have taken. These can included pictures of friends or family. - You must incorporate filter(s) - You must use some sort of double exposure. - Your Document must be 1536 x 1024 pixels (that is what we will need for print size) Things to keep in mind: * your text needs to be flipped (backwards) otherwise will appear backwards when the iron on is transferred * Think about how the book will be assembled--make conscious artistic decisions such as composition, how will you handle your edges, keep your elements of art and principles of design in mind. *try to visualize your book completed. This will help when you are planning the digital portion of the project. *Remember, there are many ways to approach this project. As in any artwork, there are no wrong answers....your grade will be based on the above checklist, as well as your work ethic. Below are some examples of digital collages that I found. Take a peek to get some ideas. Your first step will be to gather your materials (images, text, quotes, what you want to include in your collage). I am almost finished with my example and will share it when I am done. - Save everything to a folder on your desktop-or drive so that you do not lose track of them When setting up your file in GIMP. Go to FILE-->NEW. Under Templates select the US LETTER (300ppi). **this will give you a large enough image space to print a high resolution document.** Digital Coloring PagesWith the craze of adult coloring books in full swing. I thought it might be fun to give some of you early finishers a chance to do a digital coloring page. It is simple, find a page you would like, save it. Open it in GIMP and Use your paint bucket tool to fill in the spaces. Some of these pages are very complicated so you will want to zoom in on various sections before you color. I will give you extra credit points or you can replace each completed page for a blog post in the future. have fun! OR.......You can play around with designing your own mandala coloring page.
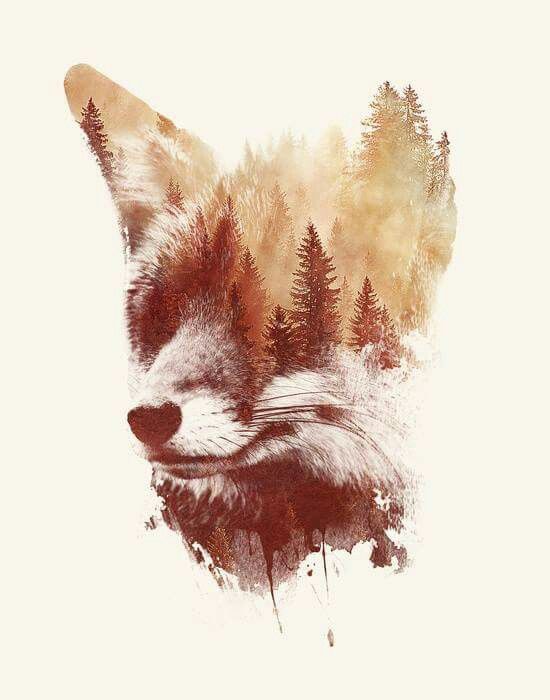
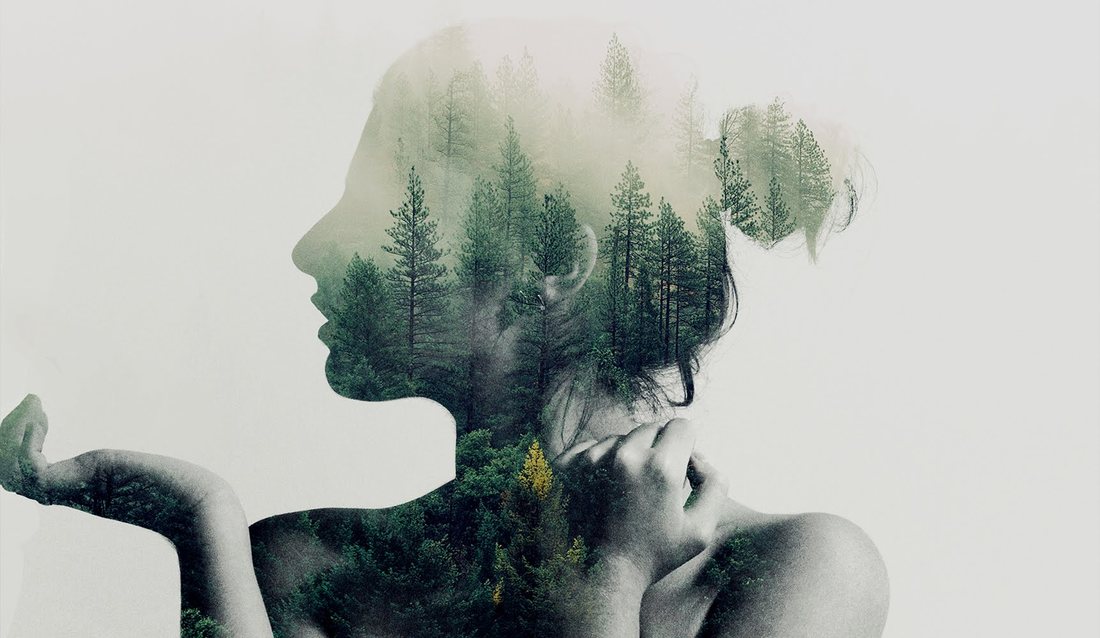
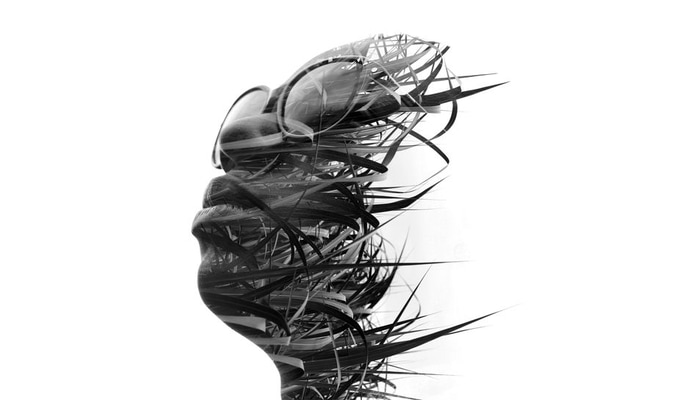
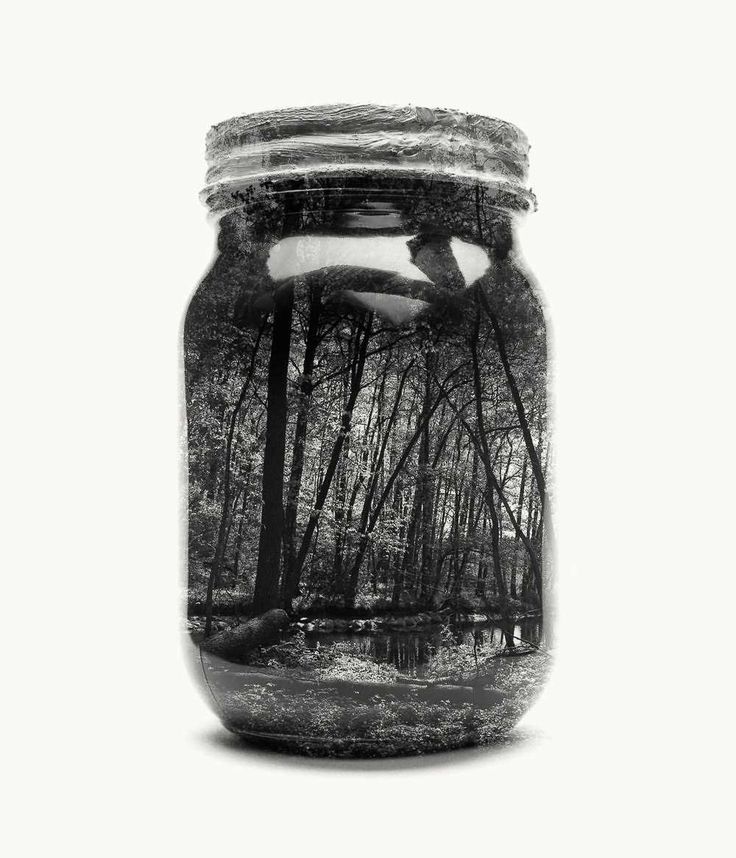
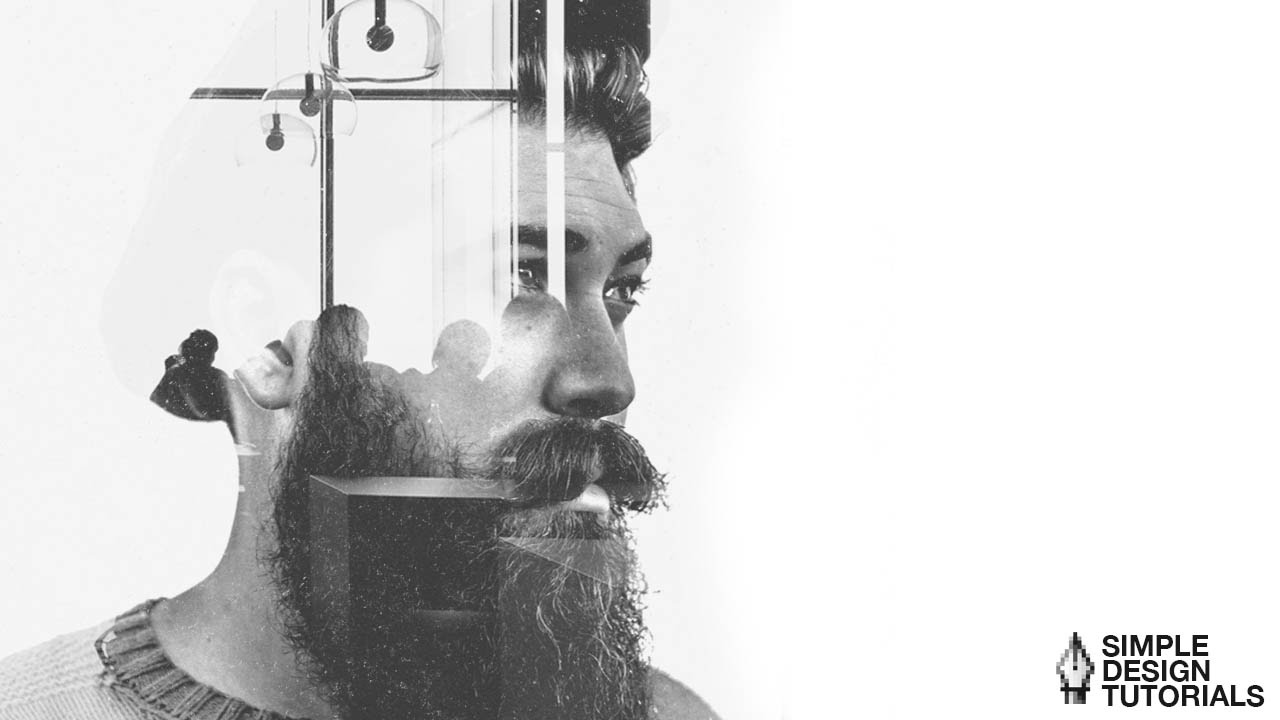
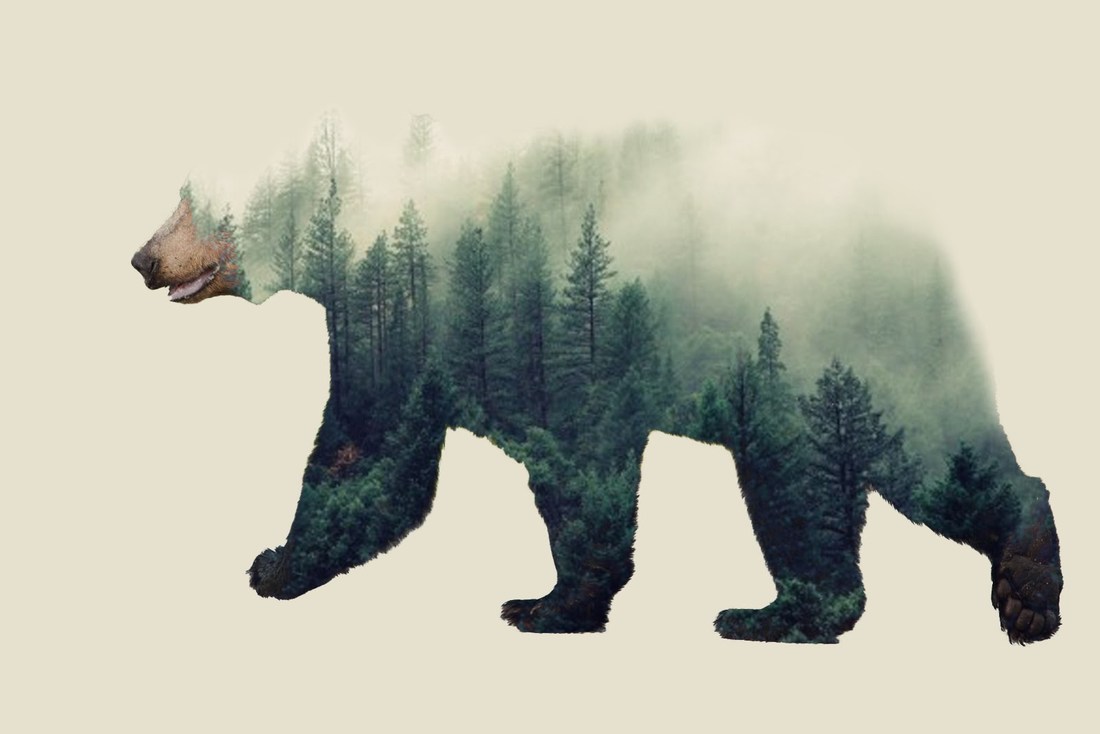
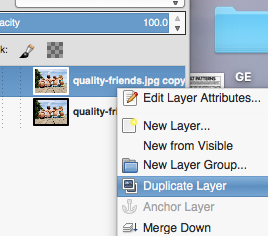
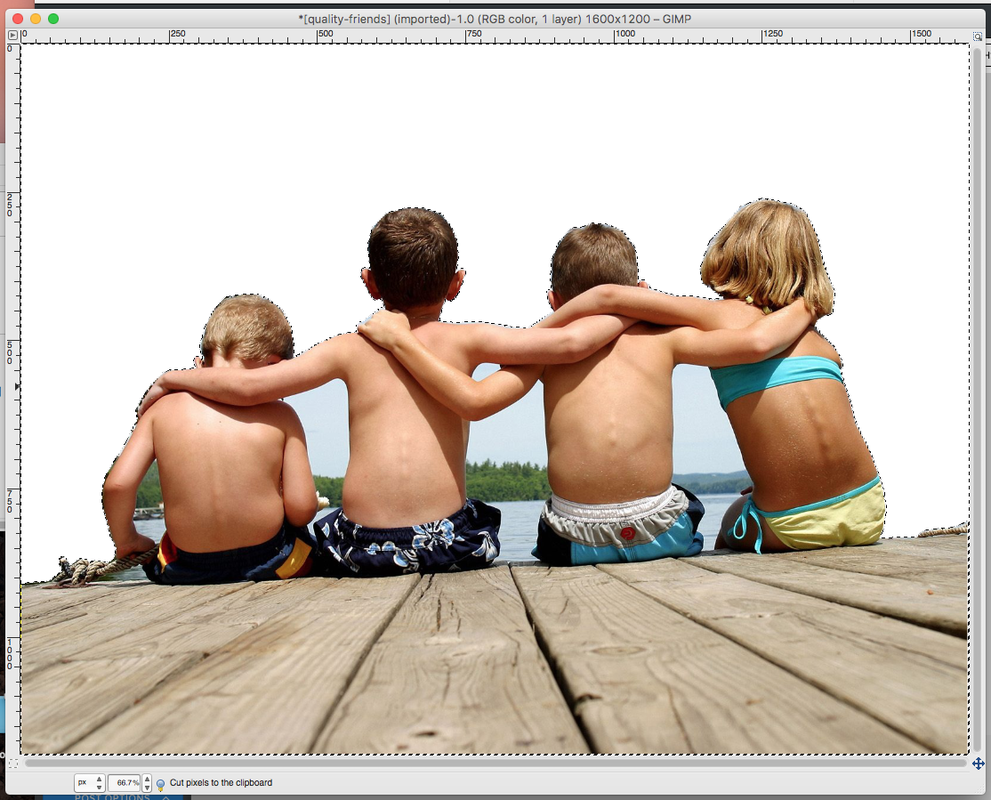
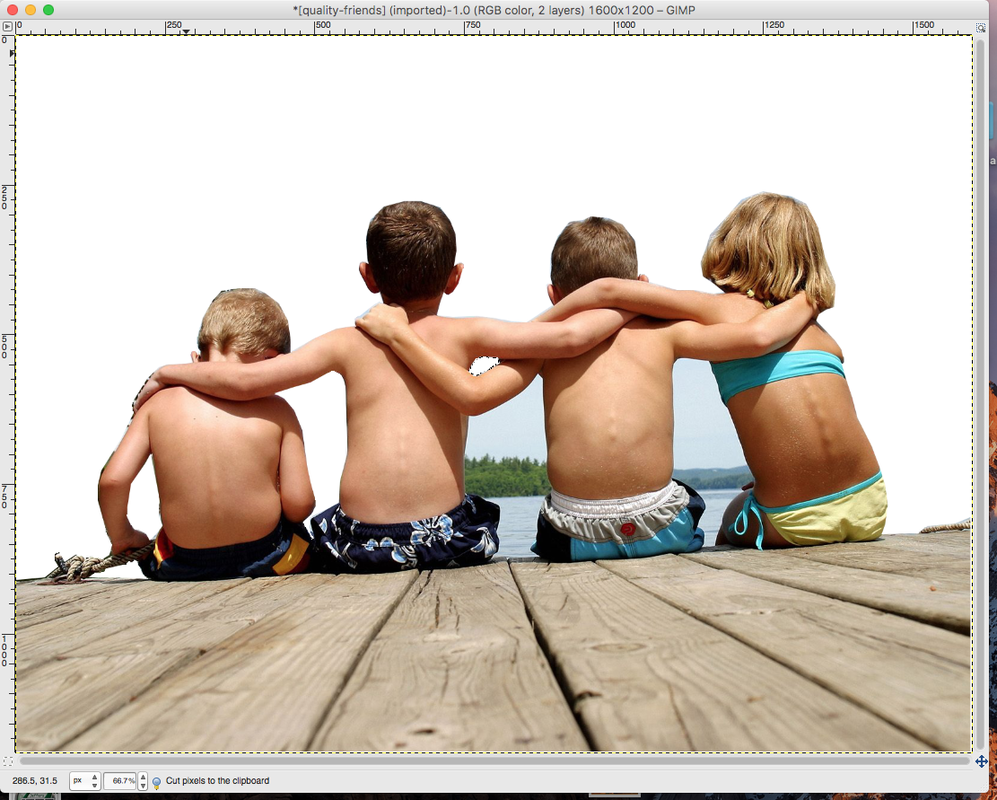
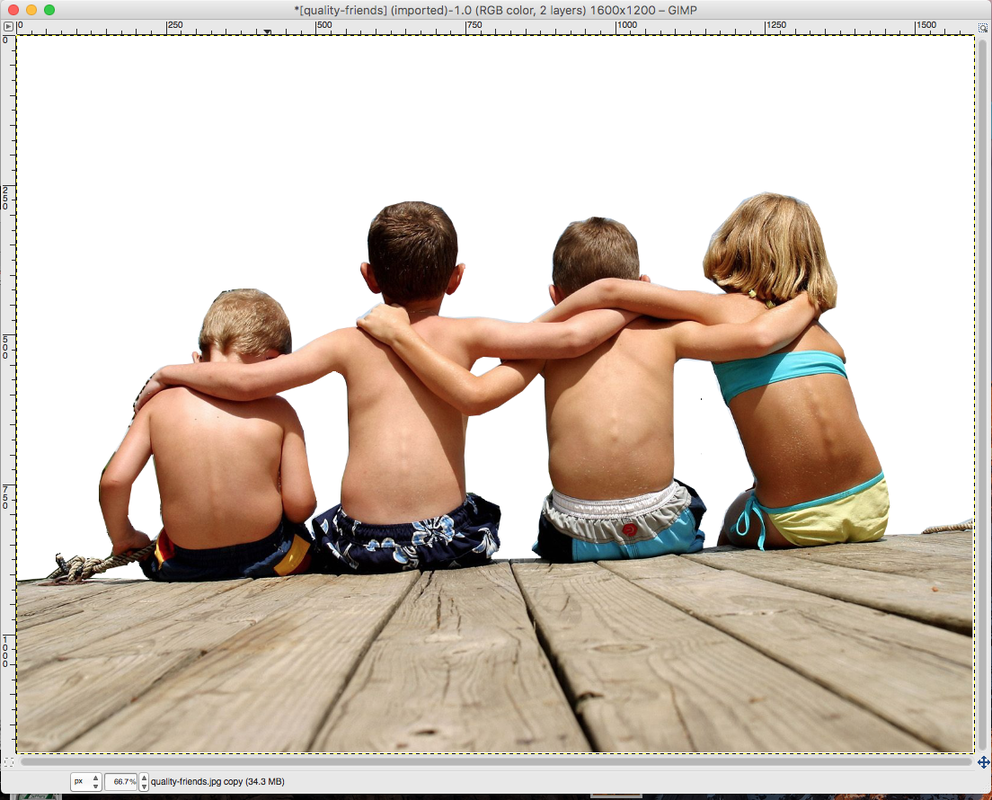
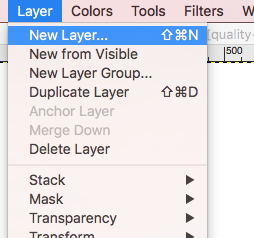
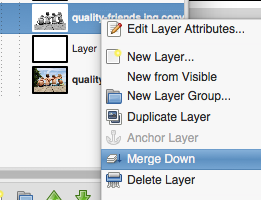
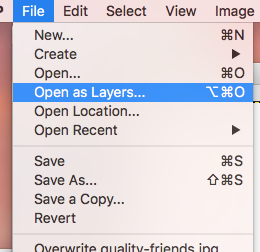
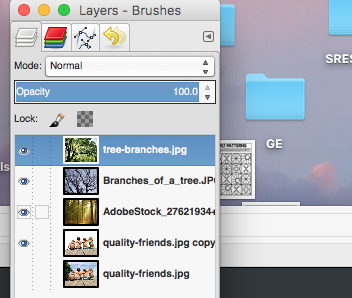
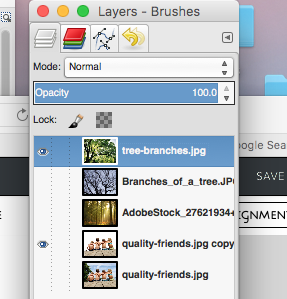
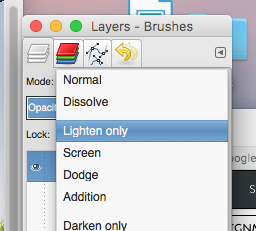
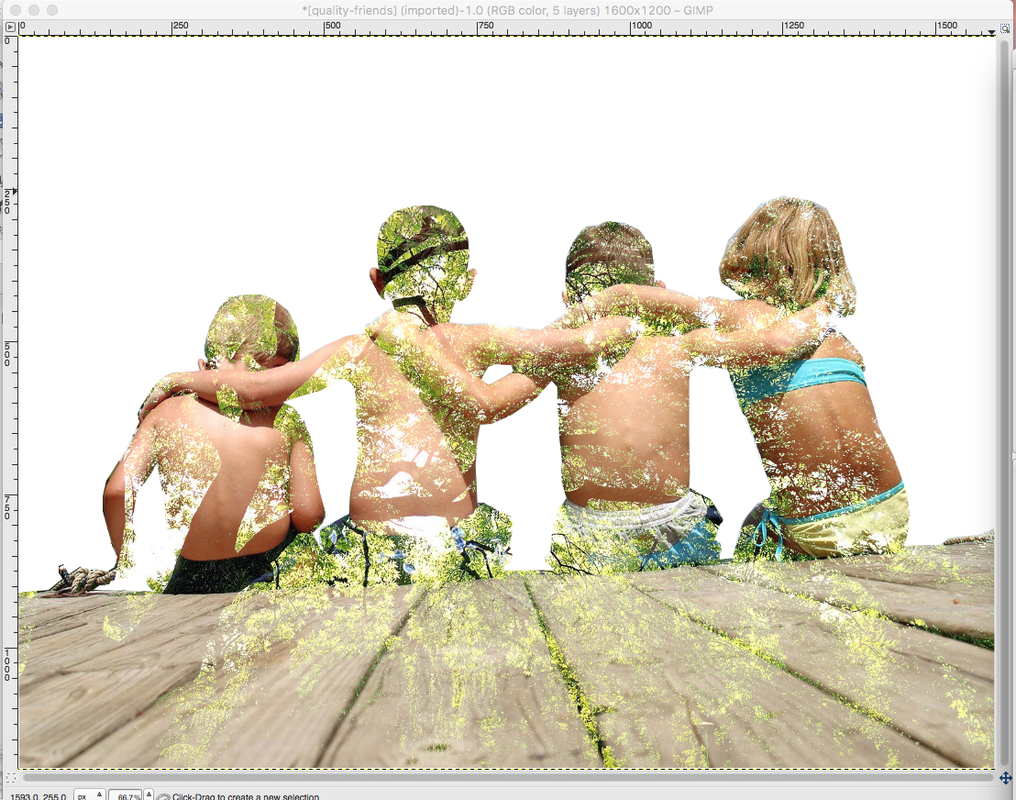
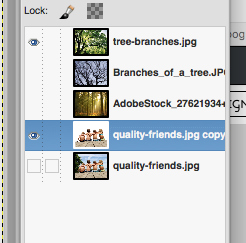
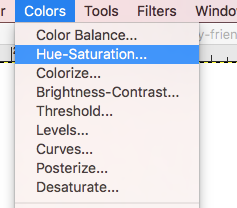
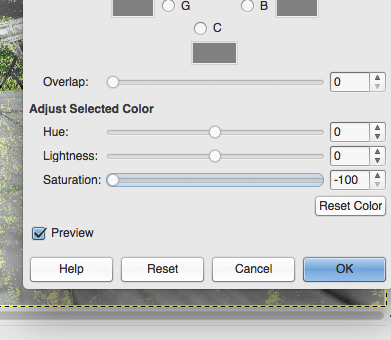
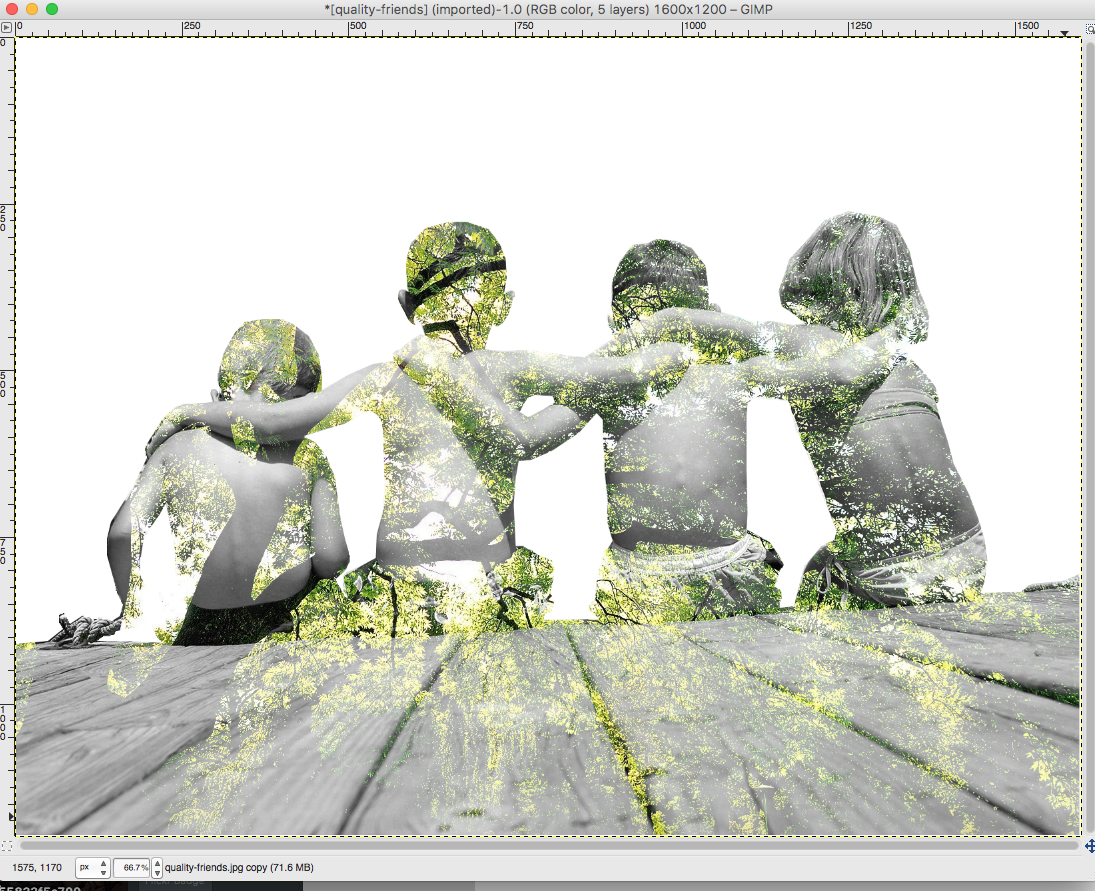
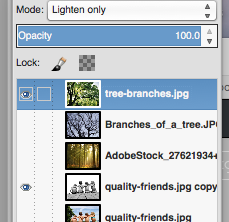
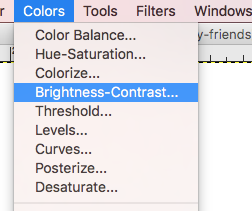
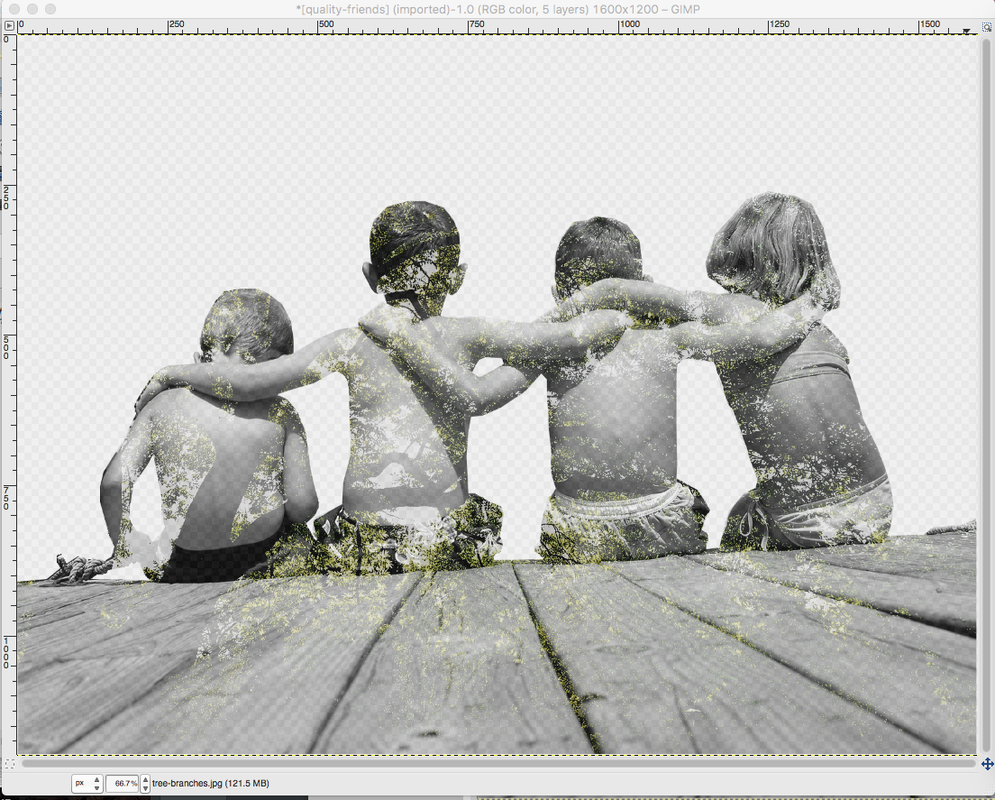
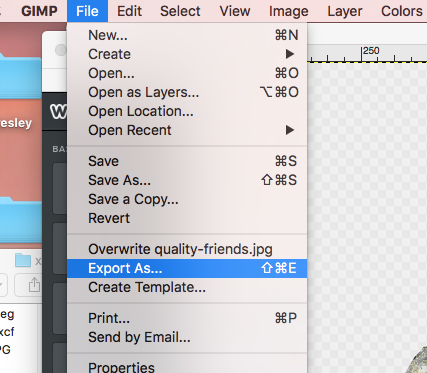
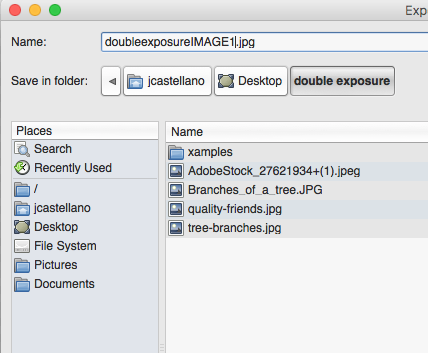
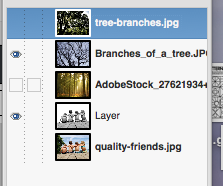
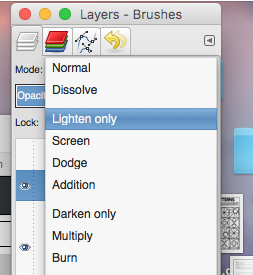
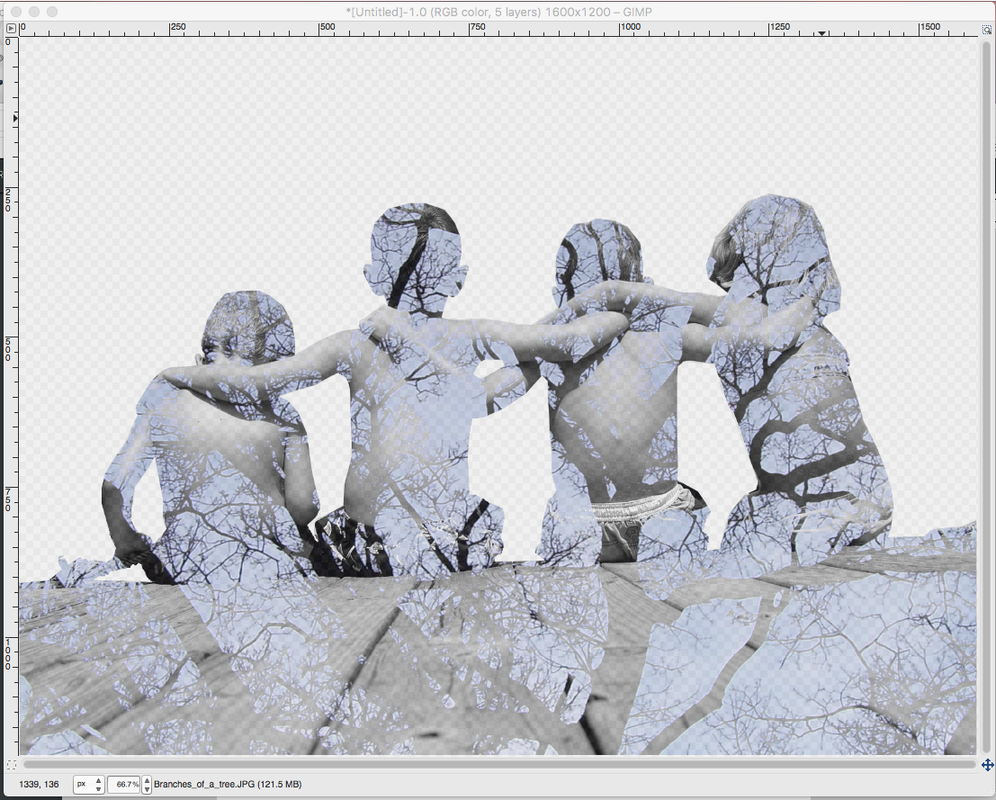
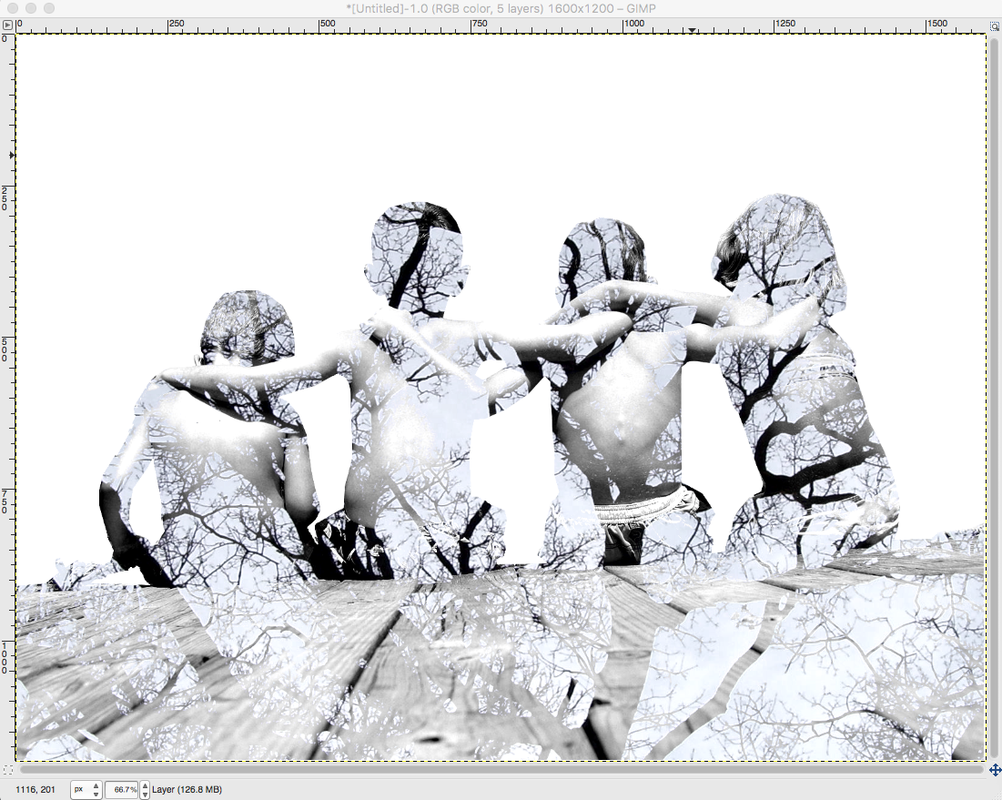
Color Mandala: Allows you to design and save your own unique geometric mandala. Double Exposure, or Multiple Exposure, is a photographic technique that combines 2 different images into a single image. This can be done using traditional photography as well as digital photography and through the use of a photo editing software such as Photoshop or GIMP. Here are some examples of Double Exposure Photography--feel free to google double exposure to see some other examples/ideas. 1.) To start this project you will want to find an image you would like to use. Try to find an image that is personal to you. This does not have to be a portrait of yourself but it could be. If you need to use Facebook that is fine....just don't dilly dally :) Below is the photo I am choosing.  2.) Open this Image in GIMP and Duplicate the layer. Hide the bottom copy. 3.) Using your lasso tool, remove some of the background. This will add nice contrast when we add our texture layer. Make sure you remove the negative space as well. 4.) Create a New Layer (Layer-->New Layer). Set the background to white. Make sure that the white layer is below the image you just cut out. 5.) Merge your cut out image with the white background layer. 6.) Now find at least 3 possible images for your textured layer. This could be a landscape, a city, another photo of your friend(s) or family. We want to have several different options to work with. Below are the three images I am going to try. 7.) Open all three images as layers in GIMP. Your first image should be on the bottom. You will only work with one of these images at a time so make sure to hide the other two. 8.) While selected on your texture layer change the Layer Mode to "Lighten Only" 9.) Now select your original image layer and change the Layer Mode to "Overlay". You won't notice much of a change after this step but it is important that the Mode is in Overlay. 10.) Go to Color-->Hue and Saturation. Play around with your saturation....I am choosing to desaturate my image completely. 11.) Do the same with your texture layer. You can desaturate your image partially as well so that there is a hint of color. The choice is yours. 12.) Now go to back to your original image layer. Then go to, Colors-->Brightness and Contrast. Play around with the Brightness and Contrast Toggles until you get a look you want. 13.) Do the same for your texture layer. 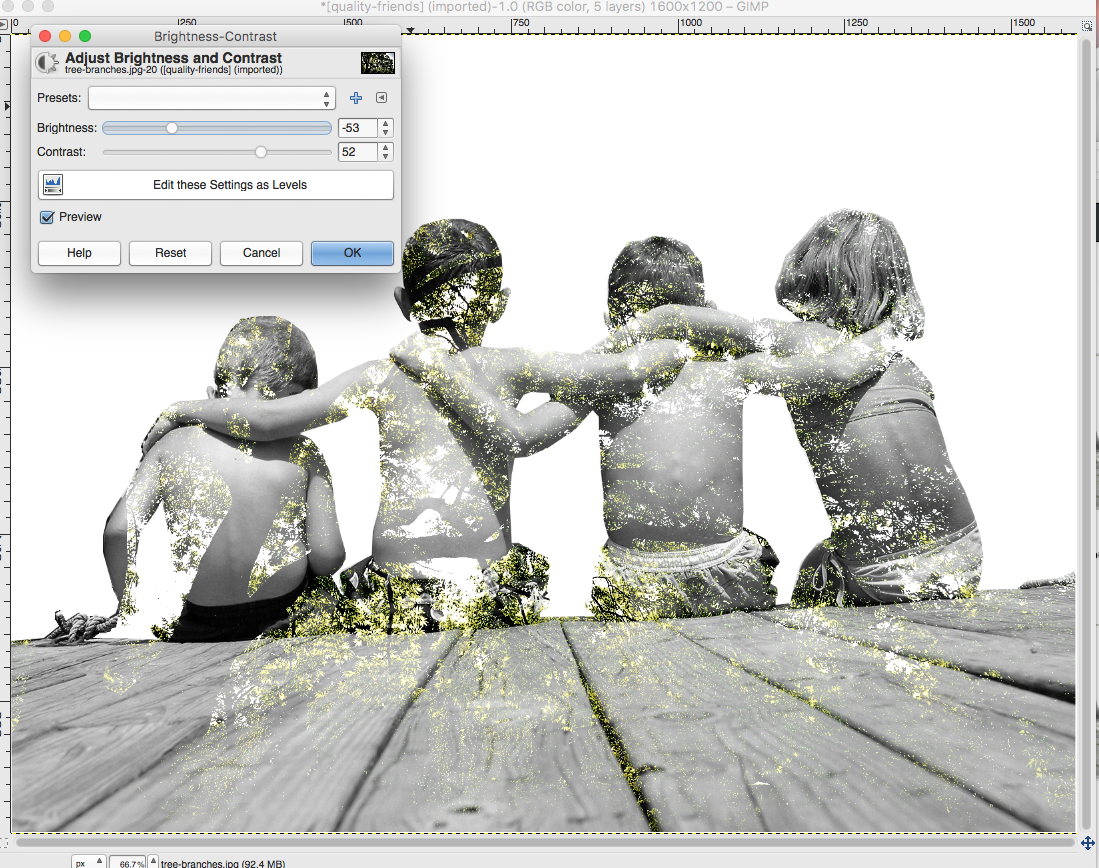 14.) Lastly, play around with the opacity of both layers until it looks how you would like it. 15.) You are finished with your first image. Go to Export-->As to save this image as a .png. Be sure to export it to a place you will be able to find later. 16.) Hide your current texture layer and unhide a different layer. Set the Layer Mode to "Lighten Only". 17.) Adjust your Colors, Saturation, Contrast, and Opacity (Steps 10-14) just like you did before until you have the look you want.  18.) Export it as another .png or .jpg and repeat this process with your final image. When you are finished you should have at least three double exposure images. Send all three to me and upload to your Website Portfolio. |
Mrs. CastellanoDigital Art Archives
May 2017
Categories
All
|


 RSS Feed